
instruction manual harley rear wheel assembly diagram
The Harley rear wheel assembly diagram serves as an essential visual guide for repairs and maintenance, ensuring proper assembly and understanding of critical components for effective problem-solving.
1.1 Importance of the Diagram for Maintenance and Repairs
The Harley rear wheel assembly diagram is crucial for maintaining and repairing the motorcycle’s rear wheel. It provides a clear visual representation of all components, ensuring proper identification and assembly. This tool is essential for diagnosing issues, such as worn bearings or misaligned brake rotors, and guides technicians through step-by-step repairs. By referencing the diagram, riders can ensure safety and functionality, preventing accidents caused by improper assembly. Regular inspections using the diagram help extend the lifespan of the wheel and braking system. Additionally, it aids in troubleshooting common problems, such as wobbling wheels or spongy brakes, ensuring precise adjustments and replacements. This resource is invaluable for both novice mechanics and experienced enthusiasts, promoting efficiency and accuracy in maintenance tasks.
1.2 Key Components of the Rear Wheel Assembly
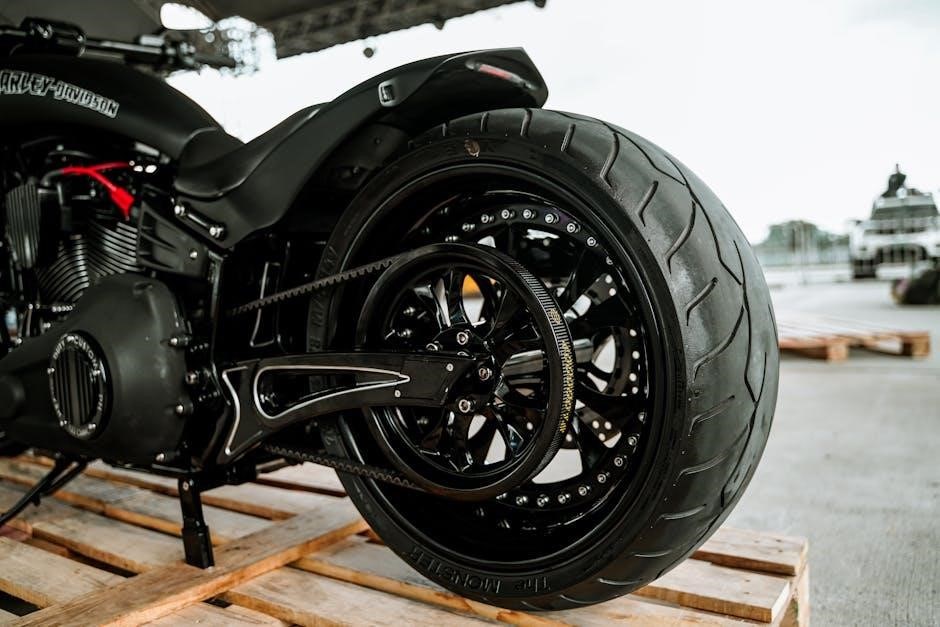
The rear wheel assembly of a Harley-Davidson consists of several critical components essential for its functionality and safety. These include the rim, which holds the tire, and the spokes, which provide structural support and maintain the wheel’s shape. The hub assembly houses the bearings and is central to the wheel’s rotation. The axle secures the wheel to the motorcycle’s frame, while the sprocket or pulley facilitates power transmission. The brake rotor is mounted on the hub, working with the caliper and brake pads to provide stopping power. Additionally, the swing arm supports the rear wheel, allowing for suspension movement. Understanding these components is vital for proper assembly, maintenance, and repairs. Each part plays a specific role in ensuring the motorcycle’s performance and rider safety.
1.3 Tools and Materials Needed for Assembly
Assembling the Harley rear wheel requires specific tools and materials to ensure accuracy and safety. Essential tools include a wheel truing stand for aligning spokes, a torque wrench for securing bolts, and a socket set for various fasteners. Pliers and punches are necessary for handling bearings and other small components. A hydraulic press may be needed for bearing installation. Materials required include new bearings, grease, and a hub assembly kit, which often comes with seals and spacers. Additionally, a wheel installation kit is recommended for proper alignment and securement. Always refer to the service manual for specific part numbers and tools to ensure compatibility and avoid damage during assembly.
Step-by-Step Installation Guide
This guide provides detailed instructions for installing the Harley rear wheel, including preparation, removal of the old wheel, and precise steps for assembling and aligning the new components securely.
2.1 Preparing the Motorcycle for Rear Wheel Installation
Preparation is crucial for a smooth rear wheel installation. Begin by ensuring the motorcycle is on a level surface and supported securely using a center stand or jack. Engage the parking brake and place blocks behind the front wheel for stability. Loosen the rear axle nut and sprocket bolts using a wrench to facilitate easier removal later. Remove any accessories or components obstructing access to the rear wheel, such as mufflers or passenger footpegs. Gather all necessary tools, including a torque wrench, socket set, and axle alignment tool. Refer to your service manual for specific torque specifications and safety guidelines. Proper preparation ensures a safe and efficient installation process.
2.2 Removing the Old Rear Wheel
Removing the old rear wheel begins with lifting the motorcycle using a center stand or jack, ensuring it is securely supported. Loosen the rear axle nut and sprocket bolts using a wrench. Completely remove the axle nut and sprocket bolts, taking care not to strip the threads. Gently pull the wheel straight back to disengage it from the swing arm and brake components. If the wheel is stubborn, tap it gently with a soft-faced hammer. Once removed, inspect the area for any debris or obstructions. Properly store the old wheel and hardware for potential reuse or disposal. Always wear gloves and ensure the motorcycle is stable to avoid accidents during this process.
2.3 Installing the New Rear Wheel Assembly
Installing the new rear wheel assembly begins by aligning the wheel with the swing arm and brake components. Ensure the axle is properly seated and the sprocket or brake rotor is aligned. Tighten the axle nut and sprocket bolts in a star pattern to avoid warping. Use a torque wrench to secure the bolts to the manufacturer’s specifications. Reattach any brake components, such as the caliper, ensuring proper alignment. Double-check the tightness of all hardware and verify the wheel spins freely without wobbling; Finally, lower the motorcycle from the center stand or jack and test the brakes to ensure functionality. Always refer to the torque specifications in the Harley-Davidson service manual for accuracy.

Understanding the Braking System Integration
The braking system integrates seamlessly with the rear wheel, utilizing the caliper, rotor, and pads to ensure safe and efficient stopping power through proper alignment.
3.1 Components of the Brake System: Caliper, Rotor, and Pads
The braking system consists of a caliper, rotor, and brake pads, working together to provide reliable stopping power. The caliper clamps onto the rotor, a metal disc attached to the rear wheel, to slow the motorcycle. Brake pads inside the caliper press against the rotor, creating friction that decelerates the bike. Proper alignment and maintenance of these components are crucial for safe and efficient braking. Regular inspection of the rotor for wear and the pads for thickness ensures optimal performance. Replacing worn pads and cleaning the rotor prevents damage and maintains consistent braking capability, essential for rider safety. Understanding these components helps in diagnosing and resolving brake-related issues effectively.
3.2 Aligning Brake Components for Proper Functionality
Aligning the brake components—caliper, rotor, and pads—is critical for optimal braking performance. The caliper must be properly positioned over the rotor to ensure even contact. Misalignment can lead to uneven wear, reduced stopping power, and potential damage to the braking system. Use a set of spacers or shims to center the caliper correctly. Tighten the caliper bolts gradually, alternating sides to maintain alignment. Ensure the rotor is clean and free of debris before installation. After alignment, test the brakes by riding the motorcycle at a slow speed and applying gentle pressure to the brake lever. This ensures the system functions safely and efficiently, providing consistent and reliable braking performance. Proper alignment is essential for rider safety and overall motorcycle functionality.

Maintenance and Troubleshooting
Regular inspection of the rear wheel assembly ensures optimal performance. Check bearings, spokes, and brake components for wear or damage. Lubricate moving parts and monitor for alignment issues.

4.1 Regular Inspection of Rear Wheel Bearings and Spokes
Regular inspection of the rear wheel bearings and spokes is crucial for maintaining the integrity of the Harley rear wheel assembly. Bearings should be checked for smooth operation, with any signs of wear or grinding noise warranting immediate attention. Spokes must be tightly secured and free from rust or damage. Proper lubrication of bearings ensures smooth rotation and prevents overheating. Inspect the wheel rim for dents or bends, as these can affect tire performance and safety. Any damaged or loose spokes should be tightened or replaced promptly to avoid wheel imbalance and potential failure during riding. Consistent maintenance extends the lifespan of these critical components.
4;2 Common Issues and Solutions
Common issues with the Harley rear wheel assembly include worn-out bearings, loose spokes, and misaligned brake components. Worn bearings can cause grinding noises and reduced stability, requiring immediate replacement. Loose spokes may lead to wheel wobble or imbalance, necessitating tightening or replacement. Brake misalignment can result in poor stopping performance and uneven wear on brake pads and rotors. Solutions involve thorough inspection, proper lubrication of components, and precise alignment of brake elements. Addressing these issues promptly ensures optimal functionality and safety. Regular maintenance and timely repairs are essential to prevent major breakdowns and extend the lifespan of the rear wheel assembly. Always refer to the diagram for precise guidance on identifying and resolving these common problems effectively.
4.3 Replacing Rear Wheel Bearings: A Step-by-Step Guide
Replacing rear wheel bearings on a Harley requires careful planning and attention to detail. Start by lifting the motorcycle and removing the rear wheel assembly. Use specialized tools to pull the old bearings out and clean the hub thoroughly. Apply a thin layer of grease to the new bearings before pressing them into place. Ensure the bearings are properly seated using a bearing installer or a suitable alternative. Reassemble the components, tightening all bolts securely. Finally, test the wheel for smooth rotation and check for any play. Proper installation ensures smooth operation and longevity of the wheel assembly. Always follow the manufacturer’s specifications and refer to the diagram for precise guidance during the replacement process to avoid errors and ensure safety.
Proper use of the Harley rear wheel assembly diagram ensures safe and precise maintenance, enhancing performance and longevity of your motorcycle. Always follow safety guidelines and consult additional resources for troubleshooting.
5.1 Final Checks and Safety Precautions
After completing the rear wheel assembly, conduct a thorough inspection to ensure all components are securely fastened and properly aligned.
- Tighten all bolts and nuts to the specified torque values outlined in the diagram or manual.
- Verify the brake system functionality by testing the brakes gently before riding.
- Check tire pressure and ensure it matches the recommended specifications for your Harley model.
- Perform a short test ride in a safe area to confirm smooth operation and proper braking.
- Always wear protective gear, including gloves and a helmet, when test riding or working on the motorcycle.
Consult the diagram or manual for any additional safety precautions specific to your Harley Davidson model.
5.2 Resources for Further Assistance
For additional support, refer to the official Harley-Davidson website for detailed diagrams and service manuals.
- Consult online forums and communities for real-world insights and troubleshooting tips.
- Watch video tutorials on platforms like YouTube for step-by-step guidance.
- Contact local Harley-Davidson dealerships for professional advice or hands-on assistance.
These resources ensure you have comprehensive support for a successful rear wheel assembly project.